
 This tutorial was written by Tierney Steelberg, Digital Liberal Arts Specialist at Grinnell College.
This tutorial was reviewed by Claire Burns, Feven Getachew, and Tanmaie Kailash, Vivero Digital Fellows at Grinnell College.
Table of Contents
- What Is Omeka?
- Installing Omeka
- Setting Up Your Omeka Site
- Adding Items
- Creating Exhibits
- Managing Plugins and Themes
- Accessibility Considerations
- Resources
What Is Omeka?
Omeka is an open-source content management tool that allows users to build online collections and curated exhibits of digital content. Users add “Items” to Omeka, that can be grouped into “Collections” and subsequently shared in “Exhibits” or on “Simple Pages.”
There are currently two versions of Omeka: Omeka S and Omeka Classic. This tutorial addresses Omeka Classic, as that version is most relevant to the kinds of campus digital projects you may be called to support as Vivellos.
Check out some examples! Omeka-based digital projects on campus include:
- Through the Eyes of a Pioneer: Living History with Edith Renfrow Smith ’37 (Prof. Tamara Beauboeuf)
- Native History Project (Prof. Deborah Michaels)
- Grinnell College Musical Instrument Collection (Prof. Roger Vetter)
- The Stepford Lives (Eva Hill ’22)
Installing Omeka
Before you get started with this tutorial, create a new subdomain (following the instructions from Reclaim Hosting on creating a subdomain) and install Omeka following the installation instructions in the Documentation wiki.
Setting Up Your Omeka Site
Once you have installed Omeka at your new subdomain, there are a few things you will want to do to get your site set up before you get started.
- Click Settings at the top of the Omeka admin navigation bar.
- From the Settings > General page, choose any additional information you might like to add or edit (Site Title, Site Description, Site Author).
- Scroll down to the bottom of the page and set the ImageMagick Directory Path (at the bottom of the page) to /usr/bin
- This needs to be set up so that thumbnail images show up correctly across the site.
- Click the Save Changes button.

Adding Items
For the purposes of this tutorial, you’ll add two images of your choice from Digital Grinnell to your Omeka site (skip any items that are PDFs or audio video files, for this exercise). Download the associated image file to your computer (by clicking the Download tab at the top, or right-clicking and saving the image) to re-upload to Omeka, and use the metadata shared on Digital Grinnell to input into Omeka.
Omeka uses a metadata standard called Dublin Core: learn more from the Dublin Core Wikipedia article or the Dublin Core Metadata Initiative website.

- Go to the Items tab on the left.
- Click the Add an Item button.
- Input your item metadata in any relevant Dublin Core fields (and leave the rest blank)
- Title: the title of the item in Digital Grinnell
- Source: add a link to the item’s Digital Grinnell page here
- Date: the listed date of the item in Digital Grinnell
- Add other fields as available/as desired from the metadata in Digital Grinnell (Creator, Publisher, Description, Type, etc.)
- Navigate to the tabs at the top and add other relevant information:
-
- Files: upload one or more files related to your item here (so in this case, the image downloaded from Digital Grinnell)
- Image file titles are used for alt text, so make sure to name your image files accordingly before uploading them to Omeka.
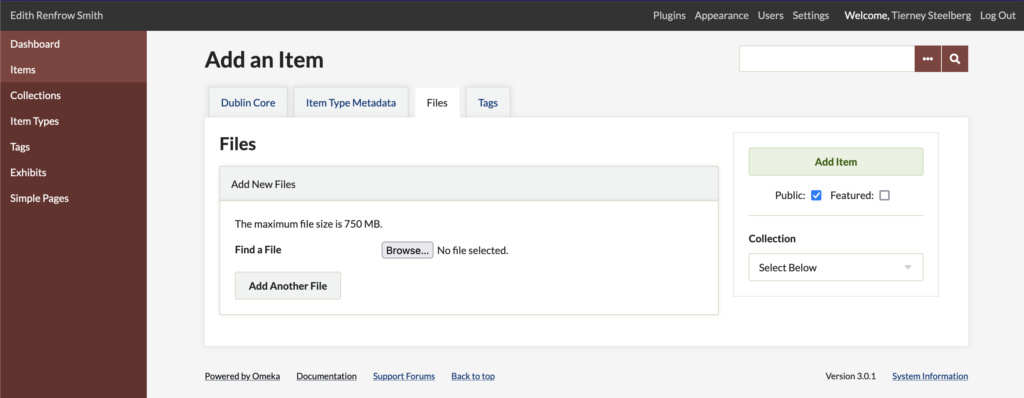
- Tags: write in any tags for your item, separated with commas.
-
- In the box on the right-hand side, check the box to make the item Public.
- Click the green Add Item button on the right-hand side.
- Repeat for your second item from Digital Grinnell.

Any of this information can be expanded upon or modified at any time – just click Edit under the item title in the item list. You can also delete items from here as well.
Grouping your items in Collections can be helpful, if you’re working with a variety of items and want to keep them organized – create these in advance from the Collections tab on the left-hand side. An item can only be in one Collection at a time.
Creating Exhibits
Exhibits allow you to organize your items into public-facing presentations, grouping them together along with accompanying text (description, analysis, etc.) and other elements as desired. Exhibits are composed of one or more pages with a linear chronology. Items can be used in multiple exhibits.
Exhibit Builder is a plugin installed on all Sites @ Grinnell Omeka sites by default. When using it for the first time, go to the Plugins page (from the top-level admin menu) and activate it.

- Once you’ve activated the Exhibit Builder plugin, navigate to the Exhibits page from the Omeka admin left-hand navigation menu.
- Click the Add an Exhibit button.
- Give your exhibit a title, custom URL slug (the part at the end of the URL after the main site address), and a description – and optionally, credits and tags.
- Check the box on the right-hand side to make your exhibit public.
- Decide whether you want your exhibit to start on this summary page, or on the first exhibit page you create (and check or uncheck the box accordingly).
- Optionally, choose a custom image from your items.
- Add a page, then give your exhibit page a title, optional shorter menu title for the sidebar menu, and a slug for the URL.

- Select the File with text content block option, then click Add new content block.
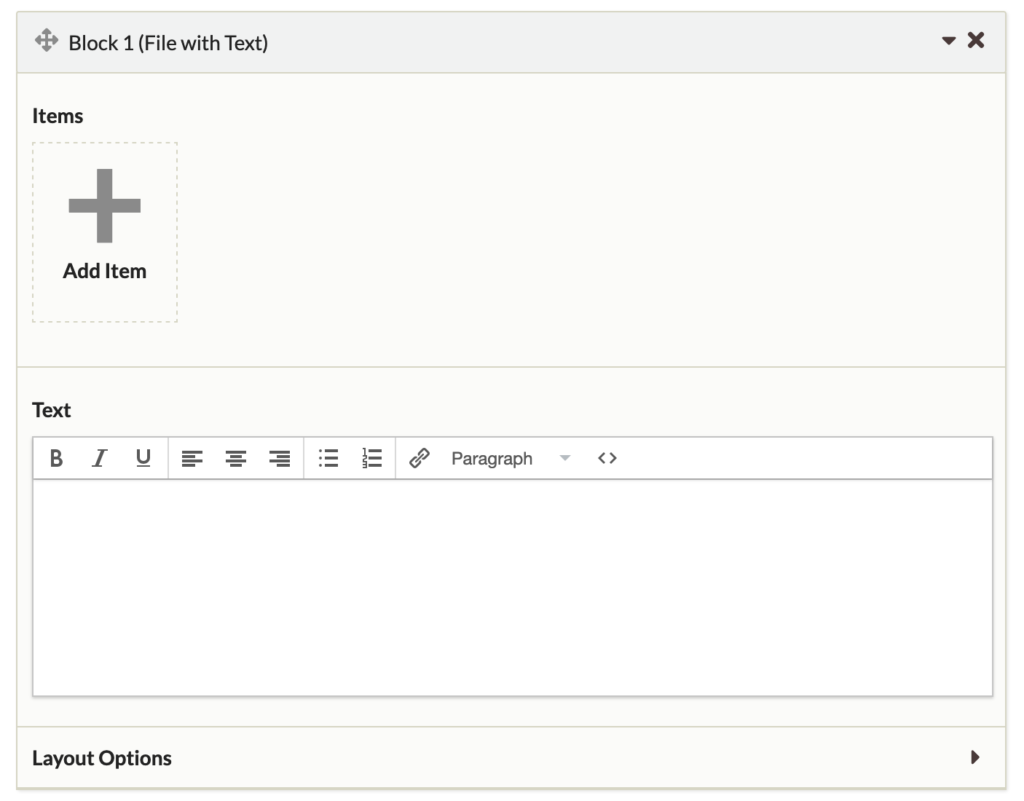
- Add your first item to a content block by clicking the Add Item button: you can browse your items and select which files to add.
- Once an item has been selected, you can add a caption.
- Add some placeholder text of your choice (feel free to just generate some Lorem Ipsum).
- Click the Layout Options dropdown to adjust the layout of your file and test.
- Add more content blocks to your page as desired.
- When your page is ready, save and add another page to create a second exhibit page for your second item.

Managing Plugins and Themes
A variety of additional themes and plugins are available to enhance your Omeka site – themes for new or more customizable styling, plugins for maps and timelines to showcase your items, plugins to enhance existing features or create new functionality, etc. (Exhibit Builder, which you just used, is a plugin installed by default on Sites @ Grinnell Omeka installations.)
You can find and download themes at https://omeka.org/classic/themes/ and plugins at https://omeka.org/classic/plugins/. Uploading new themes and plugins to your site needs to happen on the back-end through the cPanel File Manager.
- First, download to your computer your new theme or plugin from the ones available at Omeka.org. It will be a ZIP file – no need to open it, as you will upload it as is to the back-end of your Omeka site.
- For the purposes of this exercise, install the CSV Import plugin, which allows you to batch import or edit your items via a CSV file import.
- Go to your File Manager in cPanel (under the Files section).
- Go to your Omeka site subdirectory (the folder whose name is your Omeka site subdomain name).
- Open up the folder with the relevant title – themes or plugins.
- Click the Upload button in the top menu, and upload your ZIP file from the upload page.

- Go back to the folder, select your ZIP file, and click the Extract button in the top menu. This will extract your ZIP file into its own folder.
- Once this is complete, you can delete the ZIP file from the themes or plugins folder.
- Log in to the back-end of your Omeka site.
- You will now see your new plugin available to be installed and then activated from the Plugins page, and/or see your new theme available to be used from the Appearance > Themes page.
- Some plugins and themes may have additional settings for your to adjust from the back-end.

You can also look for a new theme for your site as well: download its ZIP file, upload it following these same instructions, then activate it on your site from the Appearance page.
Accessibility Considerations
“Web accessibility is the inclusive practice of ensuring there are no barriers that prevent interaction with, or access to, websites on the World Wide Web by people with physical disabilities, situational disabilities, and socio-economic restrictions on bandwidth and speed.” (Wikipedia).
As you build an Omeka site, keep accessibility in mind – think about these general accessibility recommendations:
- ensuring a logical document/page structure (nesting headings correctly H2 > H3 > H4…)
- breaking up walls of text
- use of color: appropriate color contrasts, avoiding colors that are too bright, being careful when using colors to convey meaning…)
- legible typeface and font size
- providing text alternatives to multimedia content (alt text for images, captions or transcripts for videos)
- In Omeka, image file titles are used for alt text, so make sure to name your image files accordingly before uploading them to Omeka.
- writing links that make sense out of context (avoid “click here”)
See WebAIM’s Introduction to Web Accessibility to learn more.
You can use these resources to check your work:
- Evaluate general site accessibility with the WAVE Web Accessibility Evaluation Tool.
- Check color contrasts with WebAIM’s Contrast Checker.
- Check accessible color selection with Toptal’s Colorblind Web Page Filter or the Colorblindly Chrome extension.
Resources
- See Omeka’s Accessibility Statement for information on both front and back end accessibility.
- Sites @ Grinnell support documentation specific to Omeka
- Omeka Classic User Manual
If interested, you can continue your learning with Omeka for Vivellos II, which covers batch uploads, collections & tags, Simple Pages, shortcodes, site settings. and adding users.