
TimelineJS and StoryMapJS are narrative, multimedia digital tools created by the Northwestern University Knight Lab.
TimelineJS (https://timeline.knightlab.com/) is for temporal analysis: it is a chronological timeline and allows you to describe and add multimedia to each point or span of time.
Please note that this tool requires a Google account to use.
TimelineJS Walkthrough
1. Go to https://timeline.knightlab.com/ and click “Make a Timeline.”
2. Make a copy of the Google Sheets spreadsheet template in your own Drive.
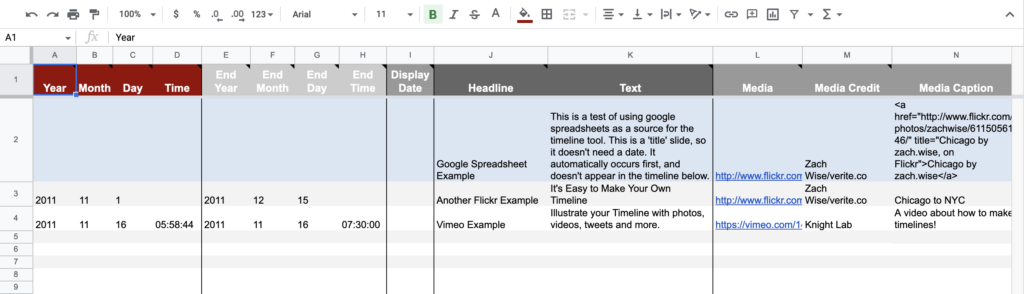
3. Fill out the template spreadsheet (pictured on the next page) in accordance with your vision for your Timeline.
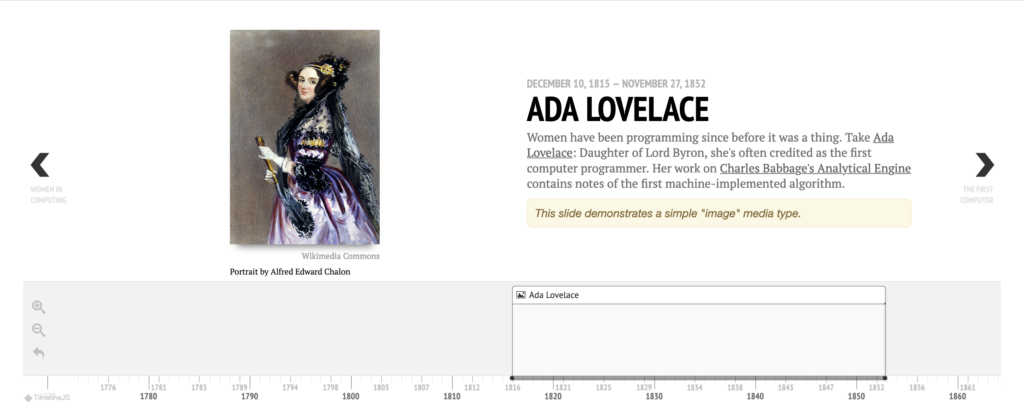
- The first row is your title, and subsequent rows are points in time or spans of time on your timeline, bringing together a headline, descriptive, text and media.
- Don’t change the column headers, don’t remove any columns, and don’t leave any blank rows in your spreadsheet.
4. Link to media (images, videos, maps, and more) in the Media column of your spreadsheet.
- Images cannot be uploaded directly: it needs to be a link to an image hosted elsewhere. See these instructions for more information about copying an image link.
- You can also add URLs and embed media from a variety of other sources: Twitter, Flickr, YouTube, Vimeo, Vine, Google Maps, Wikipedia, SoundCloud, and more!
- To share your own media, host them in Google Drive, set the sharing settings to “Anyone with the link” (it is under “More…” in the “Share…” drop down settings), and use this sharing link in your spreadsheet.
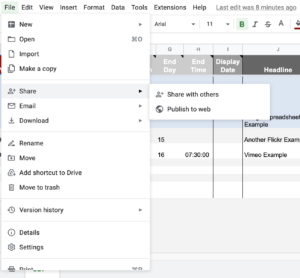
5. When you’re ready to visualize your timeline, select Share > “Publish to the web” under the File menu in Google Sheets.
6. Then copy the URL for your Timeline from the browser’s address bar.
7. Go back to https://timeline.knightlab.com/ and scroll down the page to the box where you can generate your timeline.
8. Paste your URL into the correct box, and change the settings as desired.
9. Click the Preview button to see how things look.
10. Copy your share link to share your timeline with others. You can also use the provided embed code to embed your map on a webpage.
Try It Yourself!
Make a quick timeline (3-5 entries) showcasing either:
- your life journey – past, present, and where you hope to go in the future
- OR the life of a historical figure or overview of a major historical event
- OR the major events of a recent book / TV show / movie you have enjoyed (note: events must take place within our concept of time for timeline creation purposes)
Don’t forget to include both text and multimedia!